
Lego's Drone
As it turned out, a perfect symmetrical frame for a quadrocopter can be made from the Lego Designer.
Looking for an excuse to play with the designer again? Here's a good reason :)
And by the way, such a drone turned out to be cheap, and you will not need special tools like for example in this manual (I recommend you look at it for comparison too).
I used the Lego Technician set, because it has holes in the "bricks" of the designer.
The motor and flight controller I took from the popular Hubsan X4 drone (you do not need to buy a drone entirely, only if spare parts).
Step 1: Tools and Materials
Here's what we need:
1. Lego
2. Soldering iron
3. Plastic clips
Details for the Hubsan X4 I ordered at Banggood.com that came out even cheaper than buying on ebay. Here's what you need:
1. Flight controller Hubsan 107l or 107c (take 107l if you plan to install LED bulbs on the drone, 107c if you want to install the camera)
2. 4 engines (type hollow cup) by 7mm.
3. 4 screws (and if you want, take one two in reserve)
4. The battery is 3.7 volts + charger.
5. The Hubsan control panel
The console is worth a lot, if you do not have it, it is probably more profitable to buy an old RTF drone hubsan x4 and disassemble it.
Step 2: Solder the flight controller


It will be necessary to work a little bit with a soldering iron, but there is nothing super complicated in this. If you look at the flight controller, you will see that the places where you need to solder the wiring from the motors are already marked.
And maybe you already know that the quadrocopters have two motors moving clockwise, and two against. It is very important that the motor that moves clockwise is mounted opposite the other is the same. The same goes for the motors, which move in the opposite direction.
The controller already has some soldering tin, but this may not be enough, so use your own if you think fit.
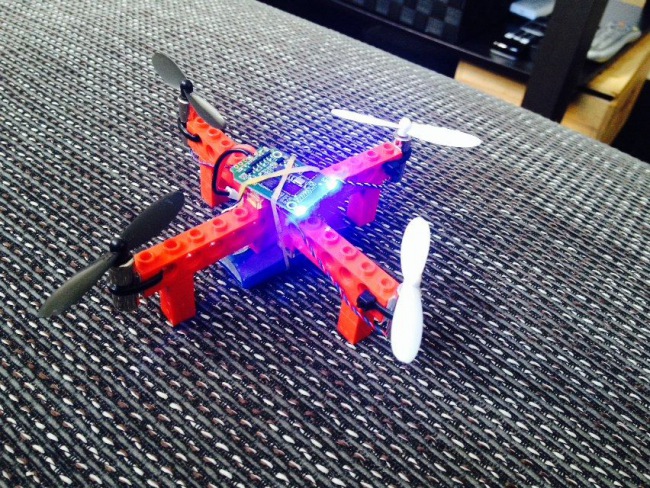
Step 3: Making a frame for a drone from Lego


The pictures speak for themselves. It is not necessary to make such a frame, as I did. Turn on the imagination, and you will get something much more abruptly! The main thing is not to make the frame too heavy.
Step 4: Mount motors and controller


I already mentioned earlier that Summer Technician - is ideal for this project, because there are holes inside the elements. To them, you can attach the motors to the plastic clips.
I also used two-sided adhesive tape, for additional fastening, but it is not necessary.
Secure the flight controller on top of the drone, and the battery under the frame, and you're ready to fly!
Write a comment